How to Connect Outgrow with Attio: A Step-by-Step Integration Guide
If you are using Outgrow for running interactive content, every result of a quiz, calculator, or assessment is a lead. The question is: where does that lead data go after someone has filled out your content? The Outgrow Attio integration sends your lead data directly into your CRM, so it never gets buried in a spreadsheet or lost in a manual export routine.If your current answer is “into a spreadsheet” or “I manually export it every week,” then this guide is for you.
Outgrow enables you to create quizzes, calculators, and assessments that help you generate leads with valuable data. However, your team can only act on this data if it lands in the right place. Attio is an innovative CRM designed for fast-moving teams, and when you use Outgrow’s native integration to connect the two, your leads flow automatically into your CRM. Let us walk through exactly how to set this up.
Why This Integration Works Well for Growing Teams
Table of Contents
Before diving into the process, it’s helpful to understand what you’re working with on both sides.
Outgrow allows you to gather more than just a name and an email address. When a person finishes a product recommendation quiz, you understand what they are looking for. When a person finishes an ROI calculator, you understand how they think about value. This information comes in with context attached, and it should be going somewhere where your team can actually use it.
Attio is founded on the principle that your CRM should work like your team, not the other way around. You can build your own records for contacts, companies, deals, or anything that is relevant to your workflow. The automation engine is also available for non-engineers, and the entire platform is flexible enough for sales, growth, and GTM teams to handle complex and non-standard processes.
When you connect Outgrow to Attio through the integration, each response from a lead gets directly mapped to a field in Attio. You get to choose which fields in Outgrow map to which fields in Attio. The entire process takes about ten minutes if you know what you are doing.
What You Need Before You Start
To get this up and running, you will need three things:
An active Outgrow subscription. The integration is only available on our paid plans. If you are on a free or trial account, you will need to upgrade before you can use the integration.
A published Outgrow content piece. The integration will connect with specific pieces of content, not your entire account. Choose the quiz, calculator, or form you would like to use and ensure it is published before you begin. You cannot set up the integration on a draft.
An active Attio account. Any paid Attio plan will do. Ensure you have admin access or, at the very least, the ability to integrate third-party tools, as you will be asked to authorize Outgrow’s access to your Attio workspace during the authentication process.
Setting Up the Outgrow and Attio Integration
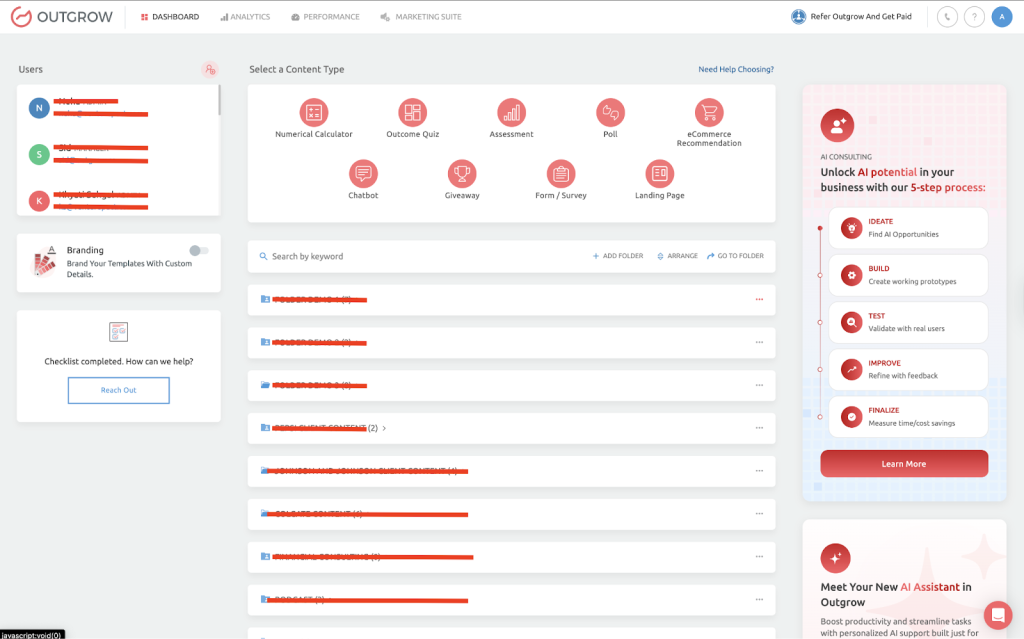
Step 1: Open Your Content in Build Mode
Log in to your Outgrow account and locate the content piece you want to link. Click on it and open it in Build mode. This is the editing interface where you can modify questions, design, and settings.
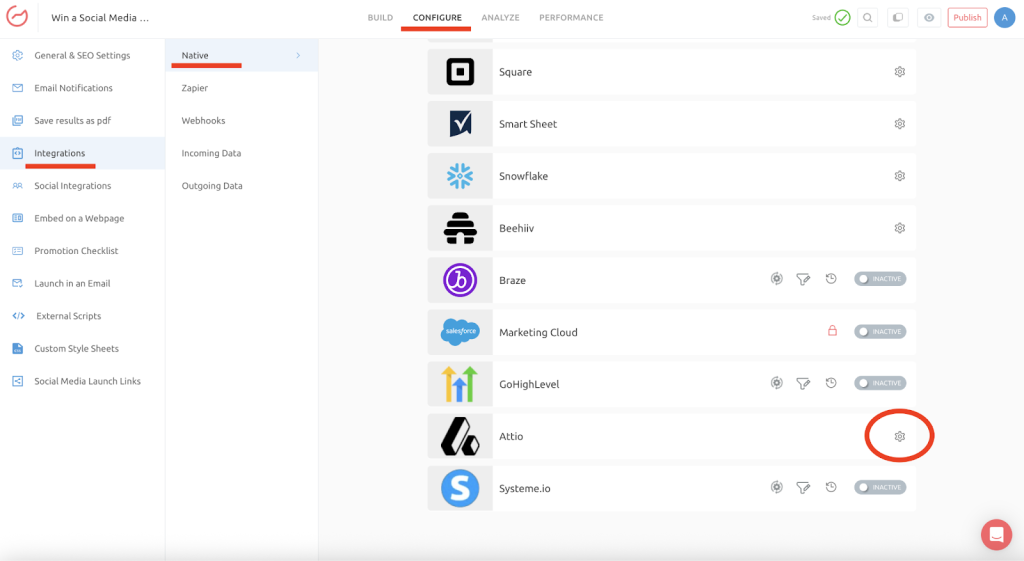
Step 2: Go to the Integrations Section
Within the Build mode, click on the Configure tab at the top. From there, you will look for the Integrations sub-tab. Once you are on that page, you will be able to see the options for third-party integrations and native integrations. You will then need to scroll through the list of native integrations until you see Attio.
Step 3: Start the Configuration
Click on the configure icon beside the Attio integration. A configuration window will appear. This is where you will tackle authentication, selection of records, and field mapping.
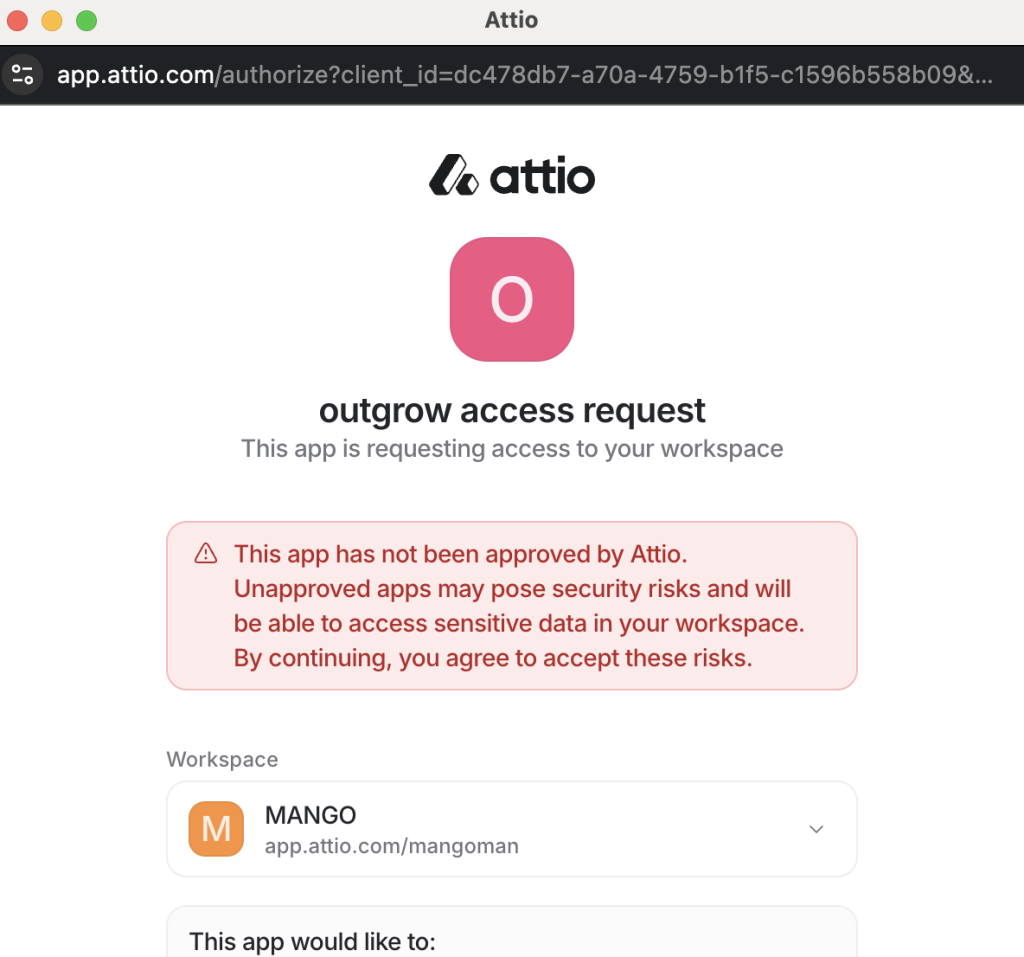
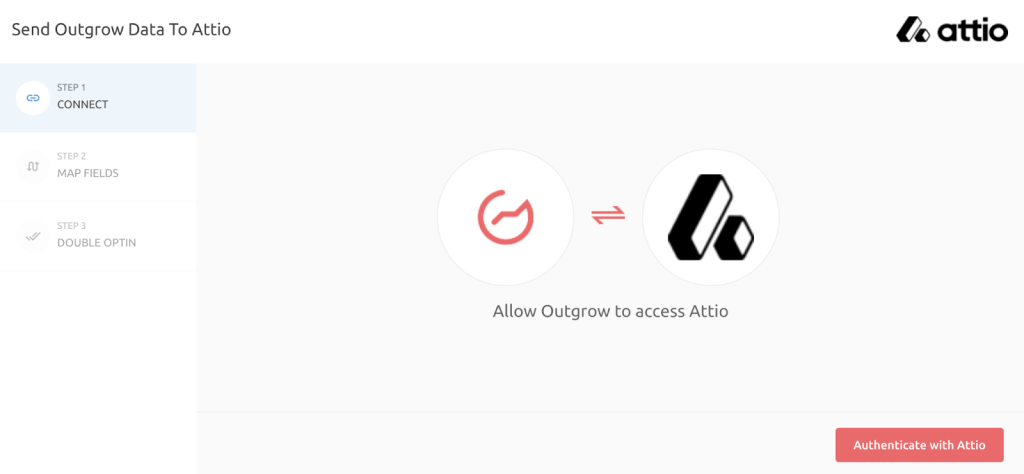
Step 4: Authenticate with Attio
Click on the “Authenticate With Attio” button. You will be asked to provide your Attio login details. After that, you will be asked to authenticate. Outgrow requires permission to write data to your Attio workspace, so you have to log in using an account that has the correct access level.
If the authentication doesn’t go through, make sure you are using the proper login for your Attio workspace. If your company uses SSO, you might need to authenticate that way instead.
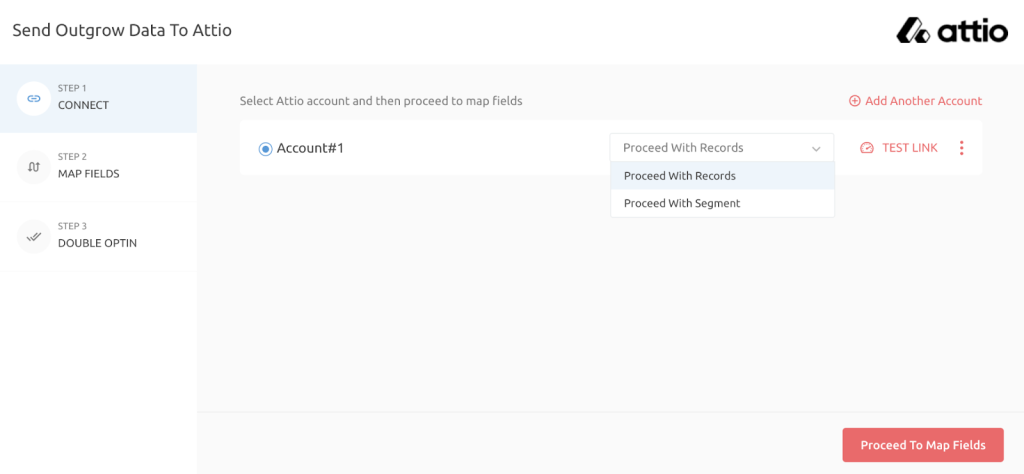
Step 5: Choose Between Records and Segments
Once authenticated, Outgrow will ask you how you would like your lead information organized in Attio. You can organize it by Records or by Segments.
If you would like Outgrow submissions to create or update a single record in Attio (such as a contact or a deal), you should organize by Records. Records are the fundamental objects in Attio, such as contacts, companies, or any type of record that your team has defined.
If you would like Outgrow leads to be added to an existing group of records based on common criteria, select Segments.
Records is the best selection for most applications.
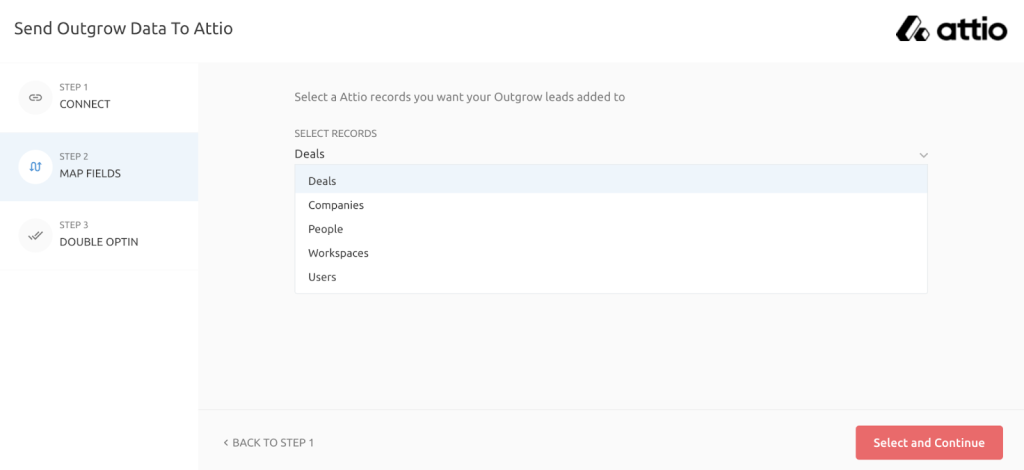
Step 6: Select Your Target Record Type
Now that you have selected Records, Outgrow will prompt you to select the type of Attio record that your leads will be added to. This could be Contacts, People, Companies, or a custom record type that your team has set up. Select the one that corresponds to how you are organizing incoming leads in Attio.
You also have the option to create a new record each time a person submits your Outgrow content. This is helpful if you know that the same person will be submitting multiple times and you want to keep track of each response separately. If you would like to update an existing Attio record when there is a match (such as an email address match), you would not want to check this box.
Step 7: Map Your Fields
This is where the integration actually becomes helpful. You will notice a mapping interface where your Outgrow fields are listed on one side and your Attio fields on the other. Map each of your Outgrow fields to its respective Attio field.
For instance, if you are collecting the name and email through your Outgrow quiz, you would map the Outgrow name field to the Name field in Attio, and the Outgrow email field to the Email field in Attio. If you are collecting custom data such as budget range or product preference through your Outgrow content, you would map that to the respective fields in Attio.
Take your time on this step. The quality of your CRM data will depend on how carefully you complete these steps. If you don’t include information from an Outgrow field or put it in the wrong Attio field, that information will be lost or misplaced.
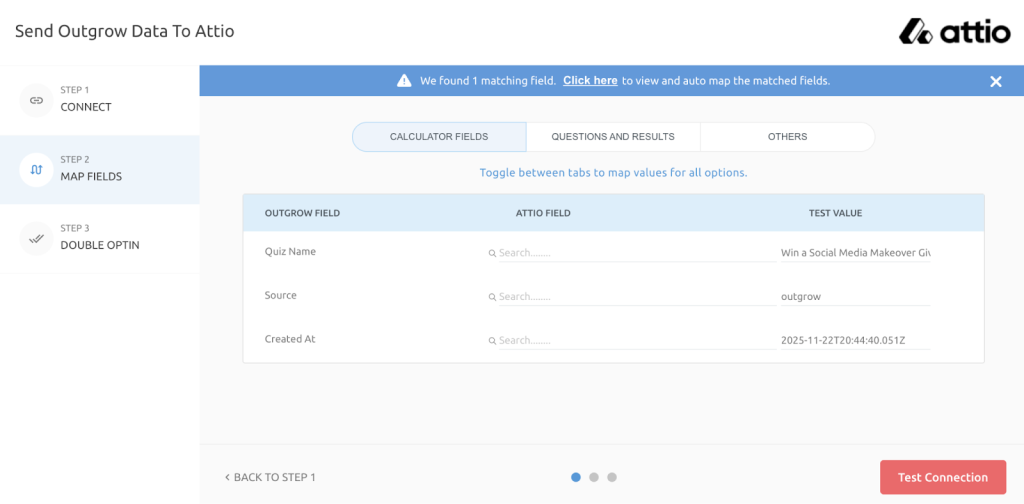
Step 8: Test the Connection
Before you save everything, click on “Test Connection.” This will perform a quick check to ensure that your field mappings are correct and that data can flow from Outgrow to Attio. If there is a problem, the test will point it out to you so that you can correct it before you go live.
Step 9: Configure Double Opt-In (Optional)
If your content will be used in marketing emails or if you are in a region that has strict consent requirements, you can turn on Double Opt-In at this point. This will send a confirmation email to your leads before their information is added to Attio.
If not, you can skip this step.
Step 10: Click Finish
Once everything is looking good, click on Finish. The integration is now enabled. From this point onwards, every new submission on your Outgrow content will automatically create or update a record in Attio.
Managing the Integration After Setup
Once you have the integration up and running, you have a few options at your disposal to keep things organized.
Re-configure: If you change Attio accounts or your login information changes, you can use this option to re-authenticate and reconnect your integration. If you run your old configuration with old login information, syncing will not work.
View Mapping: Use this to check how your fields are currently mapped without having to go through the whole setup process again. Very useful for a quick check if something doesn’t look right in your CRM.
Task History: This is your audit log. All leads that are sent to Attio will appear in this log. If there is a failure in the sync, it will display as “Failed.” You can then see what happened and resync the leads manually. Leads that are waiting to sync will display as “Waiting.”
Filter: If you are searching for a particular lead and would like to verify if they were sent to Attio, you can filter by First Name, Last Name, or Email Address. This will save you from having to scroll through the entire task history.
A Few Things to Watch Out For
The most common source of errors is field mapping. If there is no corresponding field in Attio for an Outgrow field, it will not be synced. Before you integrate, take a few minutes to work in Attio and create any custom fields you want. This will make the field mapping in Outgrow seamless.
Ensure that your record type in Attio is properly configured before integrating. If you are integrating your Outgrow leads to a Contacts record type but your Attio workspace has a custom record type named Prospects, you should choose the correct record type during the integration process or your leads will end up in the wrong place.
If you are integrating using the Double Opt-In feature, ensure that your Outgrow content informs users that they will receive a confirmation email. Users who do not confirm will not be imported to Attio, which may cause inconsistencies in your lead data if you are not expecting this.
Conclusion
The linking of Outgrow with Attio is one such integration that will start giving you good results quite soon. After the integration is set up and working, you no longer have to worry about exporting leads and instead concentrate on what you will do with the data. Your sales team will receive the leads in their CRM system, and the context from the interactive content will already be attached. This is a good start to any conversation.
The configuration itself is quite simple, and the field mapping part of the process gives you complete control over how the data from Outgrow is mapped into Attio. Whether you are handling a single quiz or multiple campaigns, this integration will work well for you without requiring any extra effort from your side.
Frequently Asked Questions
Yes, the native integration is only available on paid Outgrow plans. If you are currently on a free trial or a limited plan, you will need to upgrade before the Attio integration option becomes available in your settings.
This will depend on how you set up the integration. If you have the “create a new record every time” option turned on in Outgrow, then a new record will be created for each submission in Attio. If this option is turned off, then Attio will attempt to match the lead to an existing record.
Yes. Each content piece in Outgrow has its own integration settings. You can link as many content pieces as you want to the same Attio workspace, and each one can have different field mappings and record type settings.
The “Failed” status indicates that Outgrow was unable to successfully deliver the lead to Attio. This is typically due to an authentication problem, a field mapping problem, or an Attio record type that doesn’t match what you chose.
Outgrow does not set any limit on the number of leads that can be synced via the native integration. However, based on your Attio plan, there may be a limit on the total number of records your workspace can hold. You can check your Attio plan details if you are expecting a large number of leads from your Outgrow content.

Deeksha Malik is a Marketing Professional at Outgrow, working at the crossroads of people, brand, and growth. She helps scale teams, strengthen employer branding, and drive B2B marketing campaigns that actually move the needle. Known for balancing strategy with execution, Deeksha enjoys building meaningful campaigns and smarter growth stories. When she’s not working, you’ll likely find her with a good cup of coffee, staying curious about marketing trends, people dynamics, and what makes a brand memorable.