

How to Build a No-Code AI Agent: Setup, Design, and Deployment Guide
Table of Contents
Most teams judge a no-code AI Agent by the quality of its answers. That matters, but it’s only part of the picture. What actually determines whether people use it, trust it, and get value from it comes down to three less obvious things: whether it remembers what users tell it, whether it looks and behaves the way people expect on your site, and where you actually put it in front of them.
This guide covers all three, pulled from how attributes, design, triggers, and standalone deployment work together in practice. If you’re setting up lead qualification, appointment booking, or internal support workflows, these are the settings worth getting right first.
1. Managing and Creating Attributes
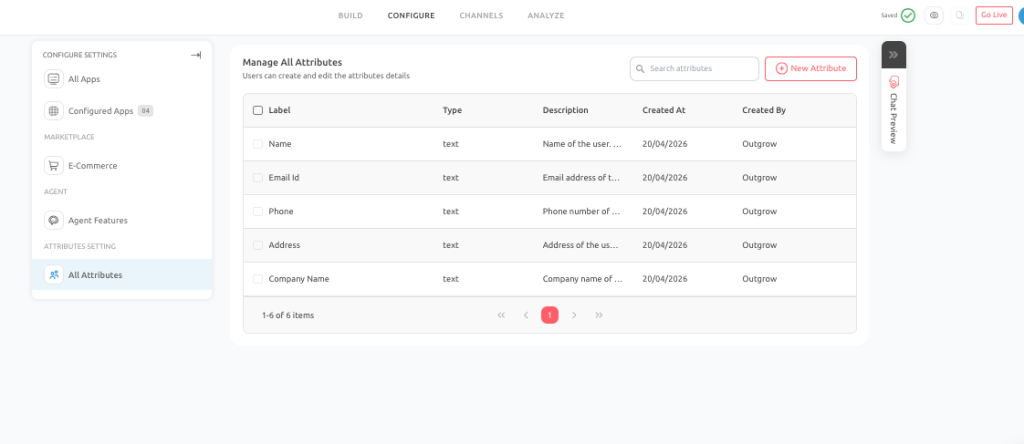
Attributes are basically the memory behind your no-code AI Agent. Every time a user shares a piece of information, that value can be captured and stored so it doesn’t get lost the moment the conversation moves on. Without this, you’re stuck with a system that can answer questions one at a time but can’t really carry context, personalize anything, or feed data anywhere useful.
What they’re actually used for
In practice, teams use attributes to:
- Store basic user details like name, email, or phone number
- Capture qualifying info such as budget, company size, or timeline
- Support workflows like appointment booking or identity checks
- Personalize how the bot responds based on earlier answers
- Push structured data into integrations and API calls
- Feed cleaner data into reporting and segmentation
How this plays out during a conversation
Say a user mentions their company size early on. That value gets stored as an attribute, and from there it can shape later responses, get added to the lead profile, get passed to a CRM through an integration, or act as a condition somewhere in your conversation flow. None of this requires the user to repeat themselves.
A few examples of how this looks across industries:
- A SaaS company asks about team size, current tools, and rollout timeline, then hands that data to sales so reps aren’t starting cold.
- A clinic collects insurance info and appointment preferences up front, which speeds up the actual booking step later.
- An internal HR bot asks for employee ID and department first, then decides whether to answer directly or route the request to a person.
When you actually need a new one
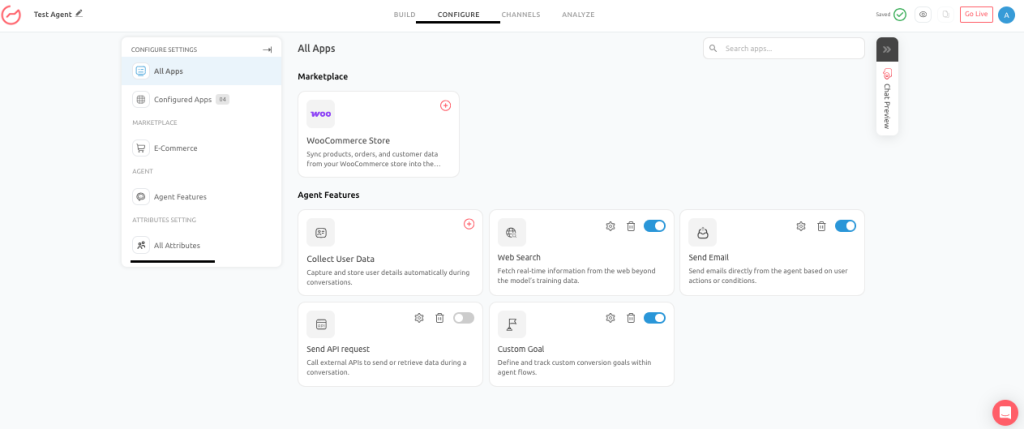
The default fields cover a lot, but not everything. You’ll usually need a custom attribute when you’re working in an industry-specific workflow, running a verification step, or sending custom fields into an API that doesn’t map to anything standard.
To set one up, open the Configure tab, then go to All Attributes under Attribute Settings, and click Add New Attribute.
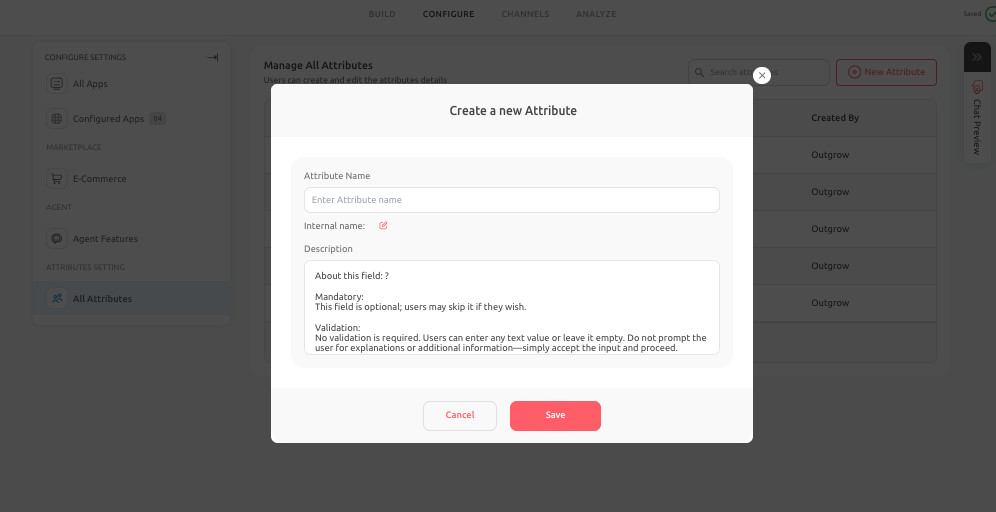
You’ll fill in an Attribute Name (what shows up in the interface), an Internal Name (lowercase, underscores, kept consistent for your team), and a short Description of what it’s for. Save it, and it’s ready to use.
A few things worth keeping in mind
- Stick to naming conventions your whole team actually follows
- Only collect what the workflow genuinely needs
- Write a real description for each field, not just a placeholder
- Watch for duplicate attributes doing the same job under different names
2. Design Customization and Trigger Configuration
Even a well-built no-code AI Agent won’t get used if it looks off-brand or shows up at the wrong moment. Design and timing are what get someone to actually click in the first place. You’ll find these settings under Channels.
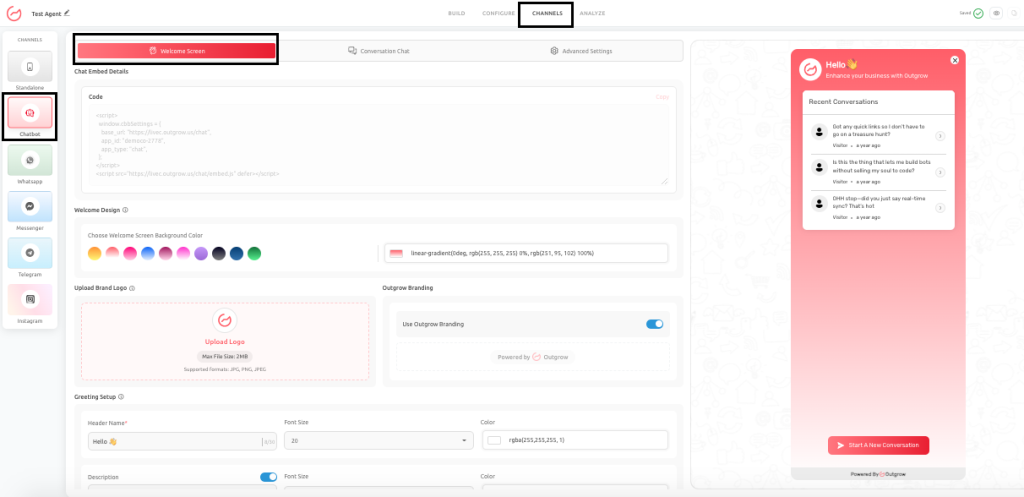
Then under Chatbot, you will find three key areas:
- Welcome Screen
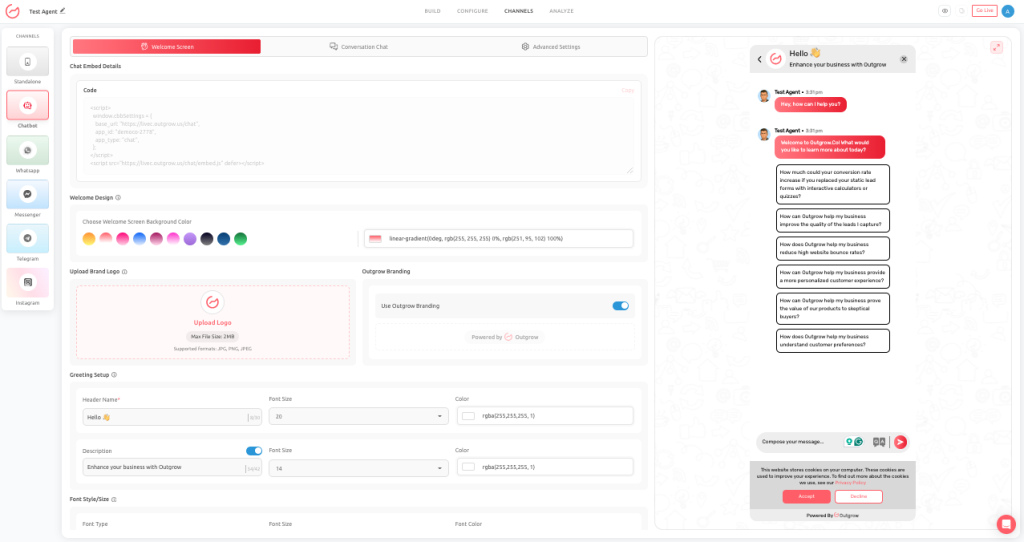
- Conversation Chat Design
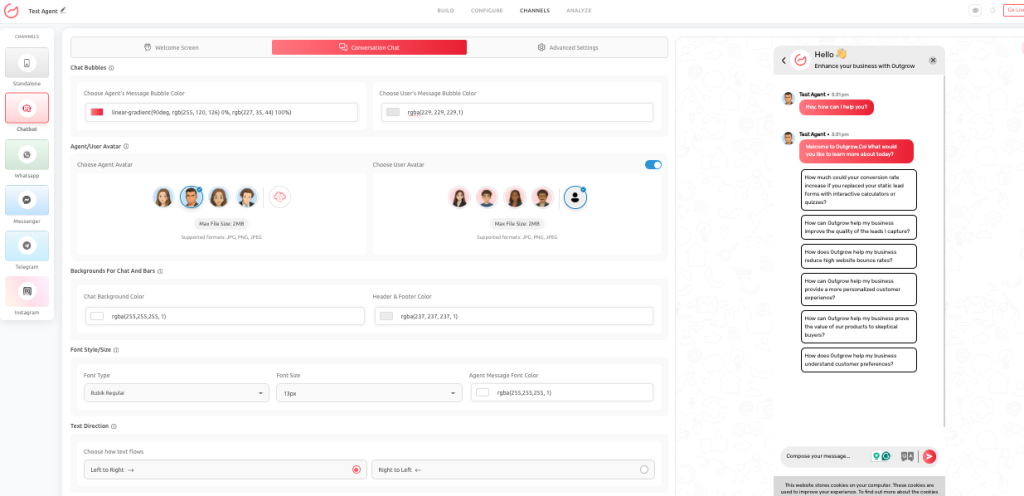
- Advanced Settings (Widget and Launcher)
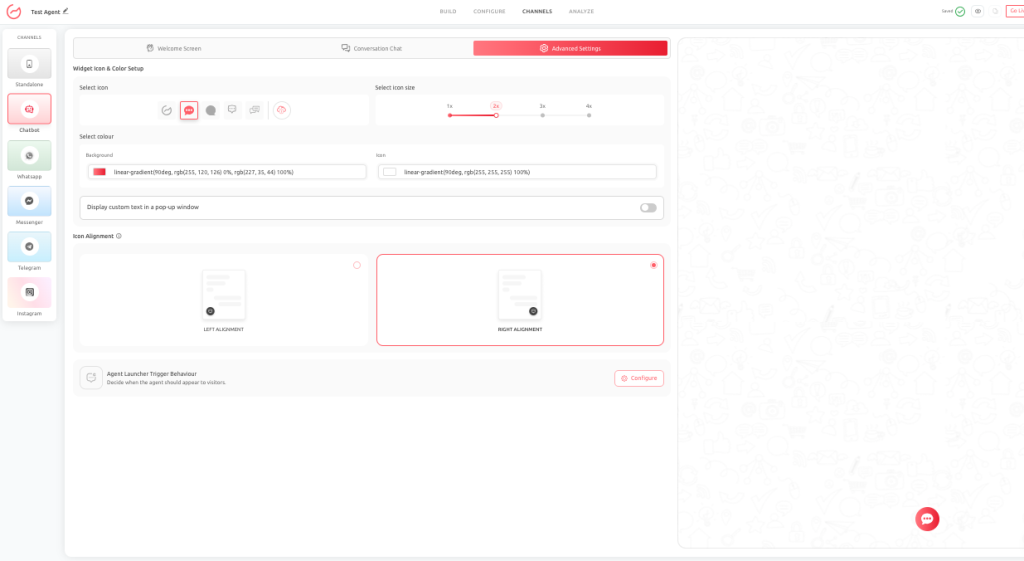
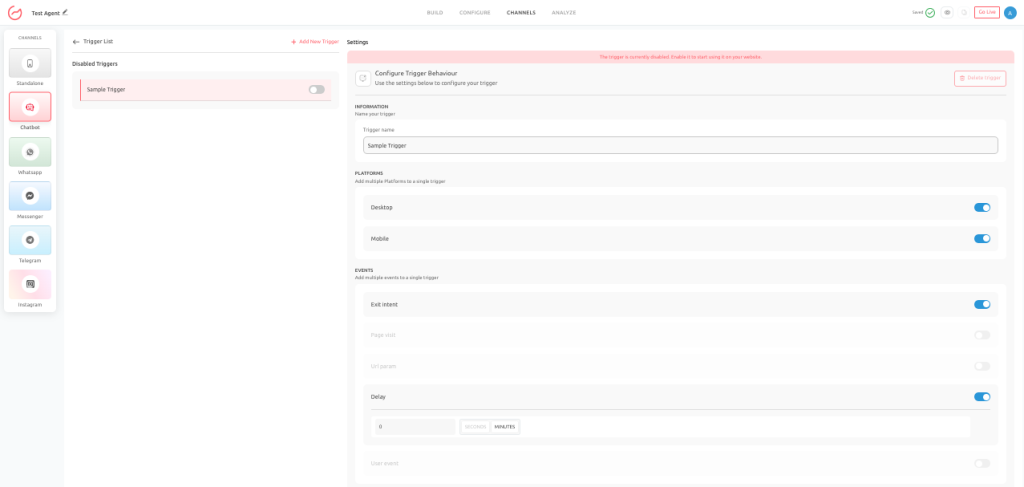
Trigger behavior can be configured within the same Chatbot section by accessing the Launcher Trigger Behavior settings.
Welcome Screen
This is the first thing a visitor sees, so it needs to do a lot of work fast: tell them what the bot does, why it’s worth their time, and what happens if they click the button. You can adjust the background, logo, header, and body text, fonts, and button styling here. Keep the copy tight; a vague greeting or a generic “Chat with us” button doesn’t tell anyone anything.
Conversation Chat Design
Once someone’s actually talking to it, this is what shapes the experience: bubble colors, avatars, background, fonts, theme, even text direction if you need it. Good contrast and a clear visual split between user and bot messages go a long way. It sounds minor, but a cluttered or low-contrast chat window makes even accurate answers feel harder to follow.
Widget Icon and Launcher
This is the floating icon sitting on your site before anyone opens a conversation. Icon style, size, color, alignment, and an optional popup message are all adjustable. Right-side placement tends to work best unless there’s a specific reason to change it, and the popup text should stay short; nobody wants an aggressive sales pitch popping up before they’ve even scrolled the page.
Custom CSS
For teams that need more control than the standard settings allow, Custom CSS is there. It’s worth using when brand alignment really matters, but test across screen sizes before publishing; it’s easy to break mobile responsiveness without noticing.
Trigger System Configuration
This decides when the chat appears on its own, and it matters more than most people expect. Show up too early or too often, and it feels like an interruption; time it well, and it feels genuinely helpful. Your options include:
- Platform targeting (desktop, mobile, or both)
- Exit intent, for when someone’s about to leave the page
- Page visit rules, so it only shows up where it’s relevant
- URL parameters, useful for campaign-specific targeting
- A simple delay, which is one of the safer defaults
- User events like scrolling or clicking a specific element
Once a condition is met, you can either show a pop-up message or open the chat automatically. Popups are the gentler option; save auto-open for cases where you’re confident it won’t feel intrusive.
To set one up: go to Channels, then Chatbot, then Advanced Settings, and open Agent Launcher Trigger Behavior. Click Configure, name the trigger, set the conditions, and publish when you’re ready.
A few real examples: an online store uses exit intent on the cart page to catch people before they abandon it. A SaaS company delays the trigger a few seconds on its pricing page so it doesn’t interrupt someone still reading. And plenty of businesses skip auto-open on mobile entirely, sticking to a popup instead so they’re not disrupting someone scrolling on their phone.
3. Standalone Deployment
Sometimes you don’t want a widget sitting in the corner of a page at all; you want the whole page to be the no-code AI Agent. Standalone deployment gives you a hosted link that works completely on its own, separate from your website, which you can drop into an email, an ad, a QR code, a social bio, or a sales message.
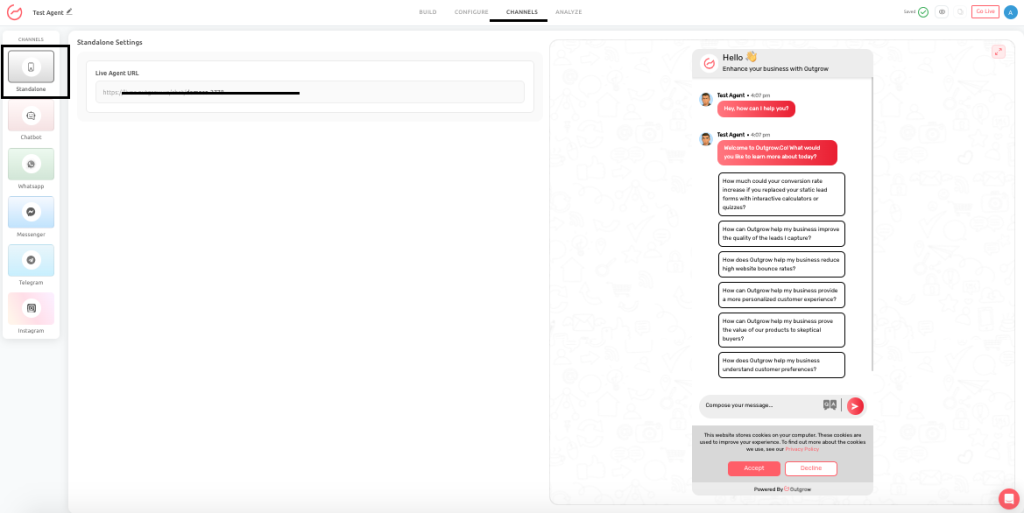
When it actually makes sense
This works best when the conversation itself is the point, not a supporting feature. That usually means:
- You want zero distractions around the interaction
- You need something to live fast, without touching your site
- You’re running a short campaign or a one-off promotion
- You’d rather share a link than embed anything
- The chat is meant to be the entire conversion path
Where teams actually use this
- An event team sets one up to answer questions, take registrations, and share the agenda; the link goes out in email blasts and on printed QR codes.
- A B2B company swaps out a static lead form for a conversational funnel that qualifies leads and books calls directly.
- An internal team shares a link so employees can get quick answers on policies or tools without digging through several systems.
- A retail brand runs a seasonal promo bot that recommends products and hands out discount codes.
What tends to work
- Keep the objective to one thing, not five
- Open with a welcome message that’s actually clear
- Design for mobile first, that’s where most people will land
- Make it obvious what to do next
Since there’s no surrounding page or context here, the first message has to carry a lot. If it’s vague, people bounce before the conversation even starts.
Conclusion
None of these pieces work in isolation. Attributes give the bot something to remember, design and triggers decide whether anyone sticks around long enough to use it, and standalone deployment lets you take the same experience somewhere entirely outside your website. Get all three reasonably right, and what started as a simple no-code AI Agent starts doing real work, qualifying leads, booking appointments, answering support questions, without needing a person behind every conversation.
Feel free to use our chat tool on the bottom right or reach out to us at Questions@Outgrow.Co if you have any questions, and our team can help you with a quick solution.
Frequently Asked Questions
They’re stored bits of user data, like name, budget, or timeline, that the bot can reuse later in the conversation or pass to other systems.
Open Configure, then All Attributes under Attribute Settings, then click Add New Attribute.
Set this under Channels > Chatbot > Advanced Settings> Agent Launcher Trigger Behavior; options include delay, exit intent, and page-specific rules.
Popups are the safer, less intrusive default. Save auto-open for high-intent moments where you’re confident it won’t feel pushy.
It gives you a link that works completely independently of your site, which is useful for campaigns, email, QR codes, and anywhere you can’t embed a widget.
Yes, the Welcome Screen, Conversation Chat Design, Widget and Launcher settings, and Custom CSS together give you full control over appearance.

Sakshi is a digital marketing enthusiast passionate about connecting brands with audiences. With a background in content strategy and social media, she loves turning trends into actionable strategies. Outside of work, you’ll find her reading a book or hunting for the perfect cup of coffee.

![How to Create a Poll: A Guide to Boost Engagement [+Tips]](https://outgrow.co/blog/wp-content/uploads/2021/05/create-poll-768x432.jpg)
