How to Build a Diabetes Risk Calculator? [6 Easy Steps]
Table of Contents
As diseases like diabetes are multiplying, healthcare providers are under constant pressure to run diagnostic tests and provide further treatment and guidance. To release some stress off the shoulders of doctors and healthcare institutions around the world, what’s needed is a Diabetes Risk Calculator. But what is it? How will it work? Let’s find out!
In this blog, we’re going to discuss what a diabetes risk assessment tool is, its benefits, and the steps you need to follow to create your own diabetes calculator.
This is not all! To help you understand better, we’re going to show you a real-life example as well! So without further ado, let’s dive into this super fun learning experience.
What Is a Diabetes Risk Calculator?
A diabetes calculator is an assessment tool that asks users certain questions regarding their health, food, and dietary habits. Based on these inputs, this interactive content ascertains whether somebody is at risk of developing diabetes or not. Please note that it is not a diagnostic tool and is only meant to help increase awareness about diabetes.
Benefits of Diabetes Risk Calculator
A diabetes risk assessment tool can be helpful in a lot of ways. Some of them are listed below for you-
1. Smooth Screening Process
Diabetes is very common and thousands of people get tested on a regular basis, thus causing overcrowding of clinics or test centers. However, the accurate results of these assessment forms eliminate unnecessary tests for people with little to no risk. This helps in making the screening process smooth as well as effective.
2. Secure Data Collection
These diabetes risk calculators help in collecting data and keeping them organized. As far as the security of the data collected is concerned, Outgrow, one of the risk assessment builders, is HIPAA compliant. Protected Health Information (PHA) is handled under the HIPAA guidelines. You will learn more about Outgrow’s risk assessment builder as we move further into the steps and example.
3. Improved Customer Experience
A well-built diabetes risk assessment will provide accurate results and appropriate guidelines to the users. A well-built diabetes risk assessment will provide accurate results and appropriate guidelines to the users as well as recommendations on medications for specific conditions such as Wegovy, Zepbound, or Mounjaro for weight loss. This will help keep the customers satisfied. Moreover, by eliminating unnecessary doctor visits and tests, these assessment tools don’t just make the process easier for healthcare providers, but also lift a lot of burden from the customers’ shoulders.
4. Growth in the Client-base
An online risk assessment form is a great way to increase your company’s conversion rate. By offering reliable services online, you can increase the chances of building trust and hence attract relevant customers to your health centres. Moreover, by offering some value to the users, you can also ask for their contact information in return for future purposes.
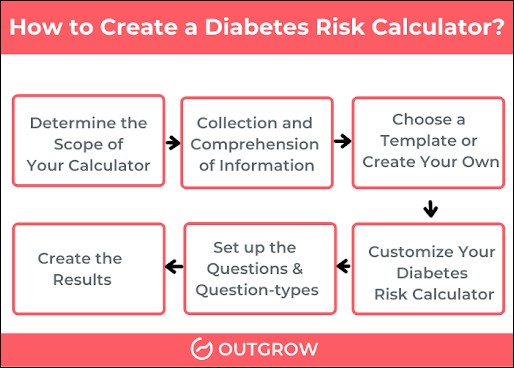
How to Build a Diabetes Risk Calculator?
1. Create a Blueprint for Your Risk Assessment Tool
The first step involves determining the gamut of the assessment tool. For this, you need to ask yourself certain questions. For example, what are you trying to achieve with this calculator? What do you want the end results to offer?
For example, a general diabetes assessment will talk about the next steps after assessing the level of risk for the particular patient.
Whereas, a more advanced diabetes risk assessment form might provide detailed instructions and suggestions regarding diagnostic centres and doctors based on the user’s location.
Thus, determining the scope will help you figure out the structure you want for your risk assessment tool.
2. Gather Relevant Facts and Figures
Before starting the building process, you need to collect accurate data for creating your diabetes assessment questions.
But where do you find this information?
This is actually easy! You can easily get reliable information from organizations like the WHO and ConnectWell. Check out ConnectWell’s official website for some information on Diabetes.
Once you are done with gathering and assimilating information for your diabetes risk assessment test, you can move on to the Outgrow builder to start the building process.
3. Select a Pre-made Template or Create Your Assessment from Scratch
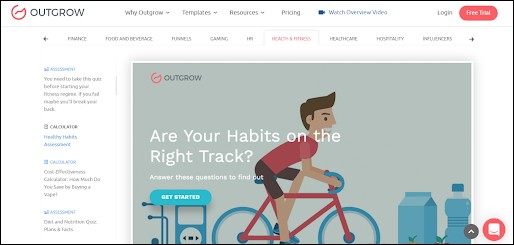
Outgrow offers numerous pre-made templates that you can use to create various types of interactive content pieces.
You can simply head over to the Templates section from the Outgrow homepage and choose the one that suits your requirements.
For your diabetes calculator, navigate to the ‘Health & Fitness’ section and you’ll get a variety of industry-standard premade templates.
Once you find the perfect template, simply click on Edit Template in order to customize it as per your requirements and use-case.
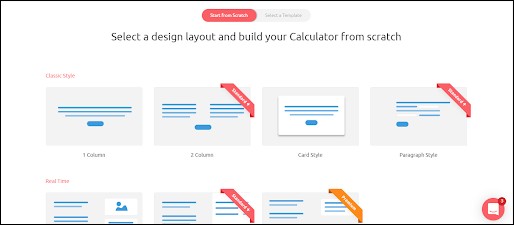
However, if you wish to create your risk assessment tool on your own, you can simply go to the Outgrow dashboard and select a content type.
In this case, you can choose from 3 content types- assessments, chatbots, or calculators.
Once you select your content type, you will be taken to a page with various layouts and pre-made templates.
To see the complete preview of these templates, hover the mouse over these layouts.
4. Modify your Risk Assessment Calculator
The Outgrow builder has a very wide scope for customization. You can customize everything- from the color schemes, background images, to font sizes, colors, and types, etc. in the display settings.
For interactive content, the colors and graphics play a crucial role in maintaining the number of visits and engagements. In the case of a diabetes risk calculator, you can use simple and soothing colors like shades of blue, green, grey, etc.
Moreover, you can add a lead generation form to your content piece to fetch all the user details in an organized way.
5. Add the Questions and Select Relevant Question-types
This is a very crucial part of the process since the questions you ask in your diabetes assessment will influence the results.
Hence, you need to be scrupulous at this stage. Create a relevant set of questions based on diabetes. The questions can be related to food and dietary habits, visible symptoms, etc. Some questions that may be common to almost all health risk assessment forms include age, gender, and body weight.
Moreover, you can choose from the different question types that Outgrow offers which include single-select, multi-select, dropdown, text input, ranking grid, etc.
For example, if you are adding a question- ‘Which of the following food items do you consume regularly?’, here you can add the multi-select question type so that the user can select all the food items they consume.
6. Set up the Results
This is the final and the most important stage in the process. The results you show will lead the way for your users in terms of the steps they need to take.
On the Outgrow builder, you can even set up conditional logic jumps in order to show different results for different user responses.
Finally, click on “Go Live” to make your assessment public.
You can then embed your assessment on any webpage, and your assessment tool for diabetes is all set!
Use-case (ConnectWell Diabetes Risk Assessment Calculator)
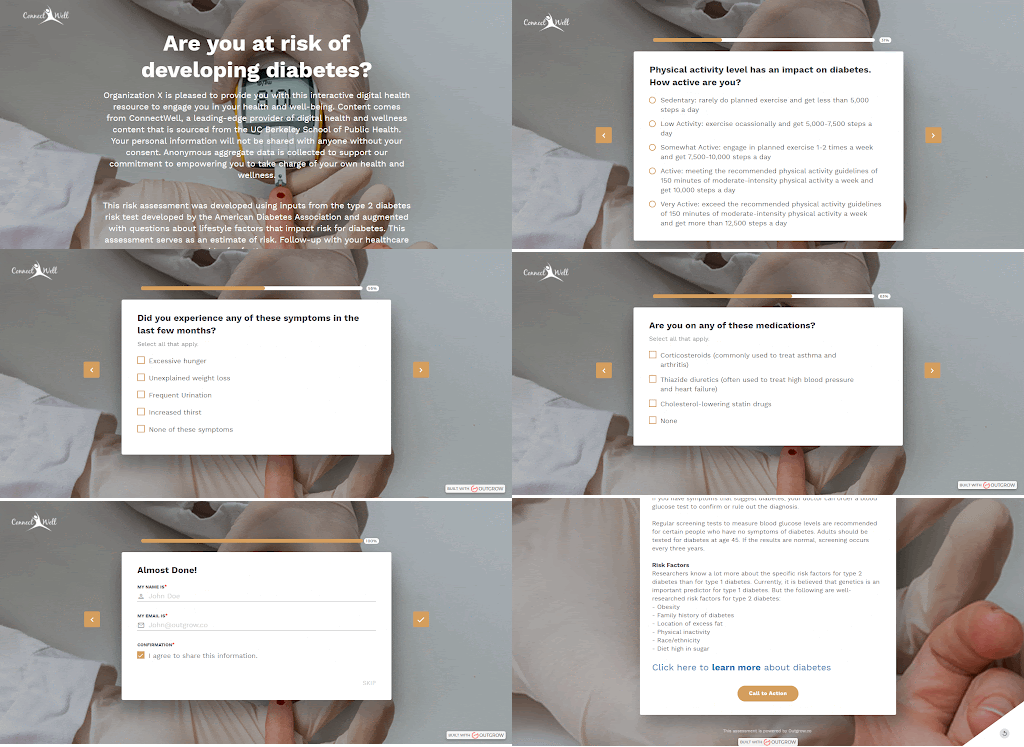
Let us look at ConnectWell’s Diabetes Risk Assessment Tool built with Outgrow to understand the process better.
The above GIF shows snippets from the diabetes calculator. On the welcome screen, you can see how the heading, text, logo, and background image are customized according to the topic.
Moving forward, there are multiple questions asking for different kinds of information from the users. For example, the first question asks the user for their age. This is a question common to almost all types of health risk assessment forms. Other common questions include gender, BMI, etc.
There is another question regarding the physical activity level of the assessment-taker. This is a relevant question as physical activity can have some impact on your blood sugar level. Here you’ll also find questions related to the food habits, prescribed medication, symptoms, family history, etc. of the user.
These questions are totally customizable. So you can edit them or add more questions to your risk assessment form as you find suitable.
Lastly, we have the lead generation form. This assessment asks for the user’s name and email address. However, you can add more questions as per your requirement.
Pro Tip: An ideal lead generation form should not have more than three questions.
Finally, we have the result page – the most important part of the calculator. The result for the calculator shown above suggests that the user is at ‘Medium Risk’ of developing diabetes. It further lays down important information about the effects of diabetes, the screening process, and other risk factors. And at the bottom of the result page, there is a CTA (call to action) that will lead the user to a webpage with more information.
This is how ConnectWell built its Diabetes Risk Calculator. And it’s time you do too!
Conclusion
In this blog, we have covered all the steps you need to follow in order to create a diabetes risk assessment tool. We hope that you were able to understand the process and you’re all set to give it a try. So, what are you waiting for? Start your free trial and create your own assessment tool!


